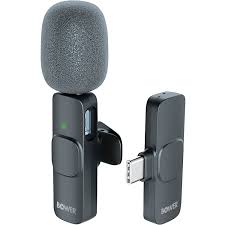
Hello! Mr. Mobility has some useful tips for using a wireless lavalier microphone with a smartphone. If you’re looking for a smooth Wireless Lavalier Microphone phone setup for recording audio or video on your smartphone, you’re in the right place.
From experience, I can tell you that using a wireless mic significantly improves your sound quality compared to just relying on your phone’s built-in microphone. Your phone can pick up your voice pretty well, but for podcasts, videos, or any serious content creation, a wireless mic delivers much clearer, more professional audio.
What Is a Wireless Lavalier (Lapel) Mic?
One of the most common wireless microphones is called a lavalier mic — also known as a clothes mic. It usually has two parts:
- The mic unit with a clip you attach to your clothing
- The receiver unit that plugs into your phone
Here’s what it looks like: a small microphone with a clip, a charging port (usually USB-C), and a receiver that connects to your phone via USB-C or a 3.5mm audio jack.

Table of Contents (wireless lavalier microphone phone setup)
Connecting Your Wireless Microphone to Your Phone
Step 1: Charge Your Mic
First, the key to a successful Wireless Lavalier Microphone Phone Setup is making sure the mic is fully charged before you begin. Make sure your wireless mic is fully charged. Plug it into a USB-C charger and wait until it’s ready.
Step 2: Power On the Mic
Press and hold the power button on the microphone until you see a blinking green light. This indicates it’s turned on and ready to pair.
Step 3: Connect the Receiver to Your Phone
The receiver end plugs into your phone’s audio input port. This could be either a USB-C port or a 3.5mm headphone jack, depending on your phone model.
- If your phone uses a 3.5mm jack, make sure your mic supports that connection.
- If your phone only has USB-C, get a mic with a USB-C receiver.
Step 4: Attach the Mic to Your Clothing
Clip the microphone onto your shirt, dress, or wherever you want to pick up your voice clearly. You might need a mirror to adjust the placement so it doesn’t look awkward or get in the way.
Step 5: Confirm Connection and Start Recording
Most wireless mics connect automatically once powered on and plugged in. Some phones might prompt you to enable USB OTG (USB On-The-Go) — just tap to allow it.
Once connected, open your camera or audio recording app and start recording with improved sound quality.
Quick Recap:
- Charge your wireless mic
- Power it on until the blinking light shows
- Plug the receiver into your phone’s audio port (USB-C or 3.5mm)
- Clip the mic to your clothing
- Enable any phone prompts if necessary
- Start recording!
NOTE: During my tests, I found out that this lavalier microphone does not work quite well with budget smartphones running older versions of Android. I tried it with a budget smartphone running Android 12 and it did not work. One solution is to get a wireless lavalier mic with a 3.5mm jack instead, if your smartphone has a 3.5mm port. Ask the retailer specifically.
Also, check out the Top 5 Smartphone Brands in Nigeria in Q1 2025 that are compatible with a wireless lavalier microphone and ideal for content creators looking to upgrade their audio setup.
Want to Get a Wireless Lavalier Microphone?
This quick Wireless Lavalier Microphone Phone Setup works with most modern Android and iOS devices. If you’re interested in purchasing a wireless lavalier mic like the one I use, check out my multiple purchase links here for the best deals and options:
- Amazon, 3.5mm jack
- VEZQUA Type C Wireless Lavalier Microphone for iPhone 15 and newer, Android, Laptop, Tablet, PC
- Mini Mic Pro Wireless Microphone for iPhone, iPad, Android
- MAYBESTA Professional Wireless Lavalier Lapel Microphone for iPhone, iPad
These mics offer great value and quality for beginners and pros alike.
Watch the Video
Join the Mobility WhatsApp Group to be notified of the most important articles and deals: Join now
